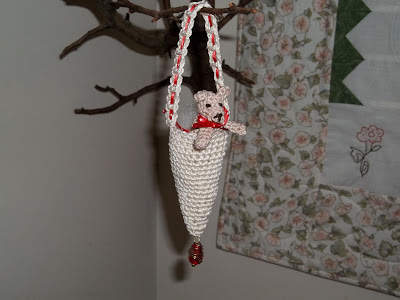
Tussie Mussie Ornament
 |
| From 2011 Projects |
I was given a little challenge and this is what I came up with. I couldn’t find anything on Ravelry or the net like it.
Most Tussie Mussies are made from a round doily, either paper, crochet, knit, etc, then folded to make a cone shape. So here is mine, cone shaped right from the beginning. I’m giving you the directions to make the basic shape, then it’s up to you to decorate as desired. Directions require you to have basic knowledge of crochet and terms.
Materials
- Aunt Lydia’s Size 3 crochet cotton
- size 1 hook (2.35mm)
Directions
- chain 26, join
- Row 1: ch 1, sc in each chain stitch around, join ch 1 (25 stitches)
- Row 2-9: 1 sc in each sc, join, ch 1
- Row 10: *3 sc, decrease over next 2 sc* around, join, ch 1 (20 stitches)
- Row 11-12: 1 sc in each sc, join, ch 1
- Row 13: *3sc, decrease over next 2 sc* around, join, ch 1 (16 stitches)
- Row 14-15: 1 sc in each sc, join, ch 1
- Row 16: *2 sc, decrease over next 2 sc* around, join, ch 1 (12 stitches)
- Row 17: 1 sc in each sc, join, ch 1
- Row 18: *2 sc, decrease over next 2 sc* around, join, ch 1 (9 stitches)
- Row 19: 1 sc in each sc, join, ch 1
- Row 20: *1 sc, decrease over next 2 sc* around, join, don’t ch 1(6 stitches)
- Row 21: sc in 2nd sc, decrease over next 2 sc twice (3 stitches), join, fasten off. Weave your end through the bottom and up the side. This will give you a nice point.
Strap
- Fold your cone in half (side to side) to find the edge stitch on one of the sides. This stitch and one on each side of this stitch will be where you start your handle for a total of 3 stitches. Join yarn to the right of the edge stitch, ch 1 sc in that stitch and the next 2 stitches, ch 3 turn.
- hdc in the last sc – this will give you a half dc, ch 1, hdc. ch 3 turn.
- hdc in the last stitch. Repeat until handle is desired length. With the chain one spaces you can leave as is, or weave a ribbon through the handle later if you choose.
- When handle is desired length, fasten off and sew to opposite side.
- I thread a very narrow piece of ribbon through the handle.
You are done, decorate as desired. Have fun!
This pattern is for personal use only, please do not copy and sell my pattern.
 |
| From 2011 Projects |
The little critter that I put inside is a pattern by Amy Mielke called Little Crocheted Teddy Bear. I used a size 5 steel crochet hook and DMC Baroque Crochet Cotton. I rearranged a few things to make him look more like a little dog while he was in the ornament.


So cute!
oh… This is a really cute idea!
Thanks for sharing.